Friday, November 4, 2016

My Mosaic Chest of Drawers - Part 5!

So, I finally finished decorating my miniature chest of drawers this month! Here is the final of five blog posts outlining the fun and creative journey that led me to the final product =).

My finished chest! 

--------------------------------------------------------------------------

When all of the painting was finished and dry, I gave the mosaic areas a final clean and polish - and my miniature chest of drawers was finally complete! 


Here are some pictures of the final product, starting with the painted back and base:


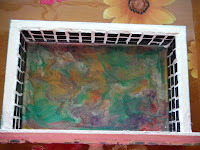
The design on the base of my chest of drawers began as a kind of
accidental paint spillage situation... but evolved into something wonderful! 

The inside of the cavity where the drawers sit is also painted:

Drizzly shiny awesomeness!


Each of the three drawers features some black mosaic tiles on the inside, with a painted drawer bottom, outsides and base. The front of the drawers feature mosaic designs that fit together to create a garden scene on the front of the chest:

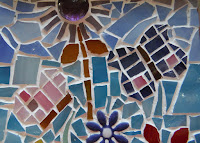
The mosaic designs on the front of the drawers fit together to create a garden scene! 


A paint design on one of the drawers =).


The drawers in the finished chest =).

The garden-themed mosaics on each side of my chest of drawers feature flowers, butterflies, birds, greenery and sky:


 The final part - and my personal favourite - is the rainbow sky mosaic design on the top of the chest:


I am really happy with the way that my miniature chest of drawers turned out - and I had a lot of fun decorating it! I actually miss working on it now that it is complete! I will have to look for a new project to embark on... It is my birthday in less than a week - maybe I will get another gift to decorate in the coming year!

~Ad =)

My Mosaic Chest of Drawers - Part 4!

So, I finally finished decorating my miniature chest of drawers this month! Here is the fourth of five blog posts outlining the fun and creative journey that led me to the final product =).

My finished chest! 


--------------------------------------------------------------------------

After all of the grouting was done and dry, I moved on to the painting stage! I wanted to give the un-mosaic'ed surfaces of the chest a pretty finish! I started by giving the exposed wooden areas a coat of white paint. 

The side of my chest of drawers - with white paint.

Then I decorated the surfaces with Pebeo Fantasy Moon and Fantasy Prisme special effects paints! The pictures below show how I gradually built up the marbly splattery layers of paint to create the finished effect:


These paints are cool in that they look textured - but the finish is quite smooth and glossy. 

--------------------------------------------------------------------------

For the next stage in this project, see the the next blog post in this series: My Mosaic Chest of Drawers - Part 5! =).

--------------------------------------------------------------------------

~Ad =) 

My Mosaic Chest of Drawers - Part 3!

So, I finally finished decorating my miniature chest of drawers this month! Here is the third of five blog posts outlining the fun and creative journey that led me to the final product =).

My finished chest! 

------------------------------------------------------------

I have to admit - grouting is my least-favourite part of mosaic making - but it is a necessary evil! Basically, you just mix up the grout mixture (according to the instructions on the packet - I mix my grout in disposable paper cups for ease of clean-up), then spread the mixture evenly over the mosaic - kind of like you're icing a cake! 

Icing my mosaic!

After the grout mixture is spread evenly, use a squeegee tool to ensure that the mixture has gotten into all the gaps between the mosaic pieces. Let the grout firm up slightly for about an hour (or less if you live in a hot climate), use a damp sponge or paper towels to remove the excess grout from the surface of the mosaic pieces. Then, leave the grout to completely set. 


After a day or two - when the grout is completely dry, polish the tiles with a damp cloth or paper towels - and you're done!

--------------------------------------------------------------------------

For the next stage in this project, see the the next blog post in this series: My Mosaic Chest of Drawers - Part 4! =).

--------------------------------------------------------------------------


~Ad =) 

My Mosaic Chest of Drawers - Part 2!

So, I finally finished decorating my miniature chest of drawers this month! Here is the second of five blog posts outlining the fun and creative journey that led me to the final product =).

My finished chest! 

--------------------------------------------------------------------------


After I had cut enough glass pieces to size, it was time to start gluing them onto my chest of drawers! The glue I used for this project was Modge Podge. It works well, is easy to clean up, and dries clear (which is good when it gets onto places you don't want glue to be seen!) I used a disposable plastic picnic knife to apply the glue (as I don't like washing brushes!).

Modge Podge - Ready for Gluing!

I started by gluing the main parts of the design onto my chest of drawers - then filling in the background, cutting more glass pieces as I needed them. I tried to leave at least a 3mm gap between the pieces (for the grout to fit into). I find it really relaxing and fun sticking the little pieces onto a mosaic! It is like a puzzle - finding the best place for each little piece to fit =).

The pictures below show how my mosaic progressed, from sticking on the main parts:


To filling in the background:


When all of the background was filled in, and the glue was completely dry, it was time to start grouting!


--------------------------------------------------------------------------

For the next stage in this project, see the the next blog post in this series: My Mosaic Chest of Drawers - Part 3! =).

--------------------------------------------------------------------------

~Ad =)